Thursday, December 23, 2010

Recipe: Creamy Peanut Butter Pie


It’s that time of year again – the holidays! And that means potluck dinners with family and friends. This year, for our first potluck dinner, I was in charge of bringing a dessert; it had to feed 6 adults and be easily transported. I always like to try something new, so I thought a pie might do the trick. I found this easy recipe online and knew I had found a good one – no baking, few ingredients, and easy to tote.

Plus, it had chocolate and peanut butter, so it was already a winner in my mind. And after a very nice dinner of roast chicken, potato casserole, stuffing, broccoli and Caesar salads (two different salads, not one), it was a nice treat with our Bailey’s and hot chocolate. This pie is very similar to my Peanut Butter Cup Mini Cheesecakes, but if you don't feel like making individual ones, this is a great substitute. It also reminds me of these Chocolate Peanut Butter Cheesecakes (hmm...I see a theme with these desserts...).

INGREDIENTS
 
2 packages (8 ounces each) cream cheese, softened
1 cup sugar
2/3 cup creamy peanut butter
2/3 cup whipped topping
14 peanut butter cups, divided
1 ½ cups chocolate crumbs
½ cup butter


DIRECTIONS

 
BEAT cream cheese, sugar and peanut butter in a small bowl until light and fluffy. Fold in whipped topping. Coarsely chop half of the peanut butter cups; stir into cream cheese mixture.

MELT butter and mix with crumbs. Spread into pie pan and pat with hands to cover evenly.

SPOON into crust. Quarter remaining peanut butter cups; arrange over the top. Refrigerate for at least 4 hours before serving.

Wednesday, December 22, 2010

Recipe: Chicken & Cheese Enchiladas

(Photo: Courtesy of meals.com)
 

I'm actually quite surprised that I haven't posted this recipe sooner, since its certainly one of my favourites, and one I used to cook often. But it has been a while since I cooked this for dinner, and since we were having our financial adviser over for dinner the other week (yes, he makes house calls), this was perfect timing. And with cooking and shredding the chicken ahead of time, putting this dish together really didn't take any time at all!

We used fresh corn tortillas, but when rolling them, they actually cracked a little, and so filling spilled out (not making it any less delicious, mind you) so an alternative is to make an enchilada ‘pie’, similar to what they do in New Mexico. I’ve also included those directions for you to try. I took leftovers to the office the next day, and this was certainly an easier alternative.

Feel free to add any other of your favourite ingredients to beef up the vegetable content.

INGREDIENTS

1 small onion, chopped
1 1/2 cups cooked, shredded chicken breast meat
3/4 cup (3 ounces) shredded cheddar cheese, divided
1 1/2 cups (12-ounce bottle) chunky salsa, divided
1/2 of an 8-ounce package reduced-fat cream cheese
8 (7- or 8-inch) soft taco-size fat free or regular flour tortillas

DIRECTIONS

PREHEAT oven to 350° F. Cook onion over medium-high heat, stirring occasionally, for 4 to 5 minutes or until tender. Add chicken, 1/2 cup cheddar cheese, 3/4 cup salsa and cream cheese. Cook, stirring occasionally, for 2 to 3 minutes or until cheeses are melted.

SPOON a scant 1/3 cup chicken mixture down center of each tortilla; roll up. Place in 13 x 9-inch (3-quart rectangular) baking dish; drizzle with remaining salsa. Sprinkle with remaining cheddar cheese; cover. Bake for 15 minutes or until heated through and cheese on top is melted.

OR:


PLACE a tortilla in a baking dish and spoon a generous portion onto one tortilla and spread to edges; layer another tortilla on top and repeat. Add about 4 layers, ending with a tortilla, and top with remaining salsa. Sprinkle with remaining cheddar cheese; cover. Bake for 15 minutes or until heated through and cheese on top is melted.

Wednesday, December 15, 2010

Recipe: Strawberries


What are the holidays without some time spent baking with loved ones? That’s what we did this weekend while on a visit to Belleville. As Diane liked to call it, it was “Baking with Ma Ma” and today’s recipe was Strawberries – coconut flavoured candies shaped like, you guessed it, strawberries. These are one of Matt’s favourite Christmas treats, and since he and his uncle seem to be the only ones who eat them, Diane thought it might be a good thing to bake together.


The process was simple enough, and actually quite fun. With only a few ingredients, the main work is getting your hands dirty by shaping each one. But when we were finished, I think they looked pretty good…and the taste test confirmed they tasted really good, too! I bet with the many flavours of Jell-o out there, you could create other types of fruits, too. Maybe next year…

This is only the start of my baking. I've yet to narrow down what treats to bake; making a list between new ones to try and old favs can be quite hard. Perhaps time will dictate what I end up making, as it usually does... But hopefully this weekend Matt and I can do some of our own holiday baking.

INGREDIENTS
1 can Sweetened Condensed Milk
16 OZ (1 pkg) Coconut (finely shredded)
2 pkgs Strawberry Jell-o Powder
2 lbs Icing Sugar

DIRECTIONS
RESERVE ½ - ¾ package of Jell-o Powder.

MIX the condensed milk with coconut and Jell-o power. Gradually add the icing sugar until the mixture gets thick enough that it can be shaped.

SHAPE mixture into small strawberries. Roll in reserved Jell-o powder and rest on a baking sheet lined with wax paper. Refrigerate until cool and hardened.

DECORATE the top ends with green icing in the shape of leaves.


Tuesday, December 14, 2010

What to do with leftover meatballs…?

When I cooked up a batch of The Ultimate Meatball for dinner a couple weeks back, there were plenty of leftovers, even after four of us indulged for dinner. I froze a batch for a later date (long since been eaten now…), and kept a few in the fridge for leftovers that same week. The plan? Meatball subs!


I saved about 6 or 8 meatballs, cut them in half (so they would sit nicely on the bun), and then reheated them in a pot with spaghetti sauce. Meanwhile, I toasted/warmed a baguette in the oven, then put everything together. Voila! An easy weekday dinner with leftovers and very little prep.

Next time I might hollow out a bit of the bread to make eating it a bit easier, and maybe melt a bit of cheese on top (I can't believe I forgot to do that THIS time!). That reminds me…I think I need to make another batch of those meatballs soon!

Wednesday, December 08, 2010

Recipe: Pan Seared Steak with Herb Butter


I don’t think I shared with you the latest recipe magazine I picked up - Best Ever Recipes. It’s from America’s Test Kitchen, and after flipping through it at Diane’s house, well, I simply had to have a copy of my own. A friend of mine, Shannon, also needed to pick up a copy for herself after flipping through mine, and I look forward to tasting the potato casserole when we have dinner at her place next weekend. So far, every recipe I’ve liked and tried has been a winner. The oven-baked onion rings were from this magazine, along with our latest dinner – pan seared steak with herb butter.

For dinner the other night, I wanted to try something different, and even though we don’t have a bbq, steak was on the menu. It is possible to get a nicely cooked steak done just in the frying pan, as is evident from most major steak houses. The recipe itself called also for frites, but I was in the mood for a baked potato, and luckily, this magazine had a recipe for that, too! What’s not to love about a potato baked in the oven then sprinkled with a cheesy breadcrumb topping and browned until golden and crispy? And no deep frying required! Complete the dish with some fresh green beans with carrot shavings, and you've got yourself a nice Saturday night dinner.


STEAK & HERB BUTTER INGREDIENTS


4 tablespoons unsalted butter, softened
1/2 medium shallot, minced (about 2 tablespoons)
1 clove garlic, minced or pressed through a garlic press (about 1 teaspoon)
1 tablespoon minced fresh parsley leaves
1 tablespoon minced fresh chives
1/4 teaspoon table salt
1/4 teaspoon ground black pepper

1 tablespoon vegetable oil
2 boneless strip or rib-eye steaks (1 pound each), cut in half

INSTRUCTIONS

For Herbed Butter: Combine all ingredients in medium bowl.

For Steaks: Heat vegetable oil in 12-inch skillet over medium-high heat until smoking. Season steaks with salt and pepper. Lay steaks in pan, leaving 1/4 inch between them. Cook, not moving steaks, until well browned, about 4 minutes. Using tongs, flip steaks and continue to cook until instant-read thermometer inserted in center registers 120 degrees for rare to medium-rare, 3 to 7 minutes. Transfer steaks to large plate, top with butter, and tent loosely with foil; let rest while finishing fries.

Thursday, December 02, 2010

A good cup of joe!

I think Matt has always had a love of good coffee, and over these past two years together, he’s taught me to appreciate the fine art of crafting an espresso (not by us, usually a talented barista), and of enjoying a coffee for its taste, not just its caffeine. It’s no surprise, then, that plain old regular coffee (aka Tim Horton’s) just doesn’t cut it for us any longer.

There also seems to be a revolution towards better tasting and better made coffee, especially in bigger cities. New coffee bars are popping up around town and, just like new restaurants to try, our list is rapidly growing. We already have a few favourites, but we love seeing what else is out there. Very timely, an article published in Eye Weekly narrows down the java joints in Toronto to check out to the Top 10. An interesting read of you also enjoy your coffee…

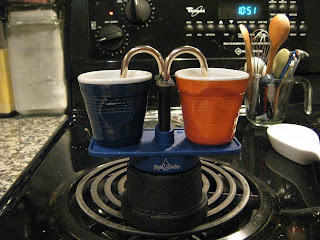
We’re also experimenting with making our own coffee and espressos at home. We invested in a French press to make freshly brewed coffee, and the difference from machine drip coffee in taste and quality is quite remarkable. We also upgraded our beans, getting freshly ground beans of our favourite Starbucks blend. And next, we’ve moved on to espressos, thanks to a tiny and wonderful little item we picked up in Italy.


I saw this in several store windows on our trip and was first drawn to it because, frankly, it’s so darn cute! It even has small espresso cups in various colours to go with it. I didn’t think Matt would go for bringing one home, but he surprised me and also suggested we get 4 cups to go along with it. This little contraption works by boiling the water in the bottom container through a filter with the ground beans, and out through each of the two pipes into the cups… brilliant!

Add a dollop of steamed milk (and sugar for us sweeter types), and you’ve got yourself a macchiato. We often drank this type of espresso in Italy, so each time we brew up a batch, it instantly takes me back to the numerous piazzas where we spent sipping coffee and people watching. When we have a bigger place with more counter space, we’re definitely going to invest in an espresso machine, full with milk steamer and everything. But until then, this little guy will do the trick.

LinkWithin

Related Posts Plugin for WordPress, Blogger...