Monday, February 28, 2011

Fat Friday - Delux


Yikes! I’m a little behind on sharing our Fat Friday excursions lately. We haven’t been heading out every week as of late, but we do try to get out at least once or twice a month. This adventure was in early January, so you can see the lag time…

For this Fat Friday, we hopped on a streetcar and headed west towards Ossington to pay a visit to Delux with our friends Amy & Kieran (although technically it was on a Saturday.) With write-ups in both Toronto Life (they raved about the Delux Cuban sandwich) and Eye Weekly (a full menu review) we were excited to give it a try.

The atmosphere inside is very relaxed and welcoming. Tables are not crammed together for maximum seating, and instead are nicely spread along the sides with a mix of tables and booths. A giant black curtain greats you at the door, at first seeming a little daunting, but then I realize it might be there to help keep the chill out when guests arrive. Or to create an air of mystique, I haven’t decided. We’ll have to see if it’s still there when the weather warms ups a bit. The lighting is rather dim, which isn't great for photo taking, but is nice for dining.

While their menu isn’t extensive, there was something tempting for everyone to try. I very much like when there are one or two things on the menu that are appealing and I’m willing to try. I DO NOT like when a menu is more than 3 pages! That makes deciding much more difficult. Sure, variety is the spice of life, but as my grade 7 teacher used to say, “Keep it Simple, Stupid” (also known as the KISS rule).


So, on to the food. For starters, Amy and Kieran shared a plate of oysters, of which they could not convince Matt nor I to try. Instead, Matt ordered a green salad topped with a salt roasted pear and hazelnut pralines. And was it every delicious! The juices from the pear worked to compliment and balance the saltiness of the salt crust.


For our main course, Amy decided on the Cuban sandwich, their house speciality, served with fries. Both Matt and Kieran opted for the Steak Frites, of the Wellington County flat iron variety (whatever that means), topped with butter and served, naturally, with fries and a mix of greens. And for myself, I ordered a roasted half chicken in duck confit served on a bed of risotto with a sweet potato puree. Everything was wonderfully seasoned and simply delicious!


We each finished our meal with a plate of freshly baked chocolate chip cookies and a glass of milk. I can’t think of a better dessert.

Thursday, February 24, 2011

Recipe #6: Leek & Potato Soup

Photo and Recipe courtesy of finecooking.com

I know, I know, another soup recipe. But there are just so many out there waiting to be tried! And with this cold weather, which can often cultivate cold and flu symptoms, what better meal to come home to than a warm bowl of soup?

Since our tortellini soup with leeks turned out quite yummy, I decided to try this Leek and Potato soup for dinner last week. I already have a version of a potato soup that calls for bacon, along with milk and cheese, so this one is a lighter version that turned out just as tasty (of course, it a bit of bacon could never go wrong… next time, perhaps). I actually forgot to include the onion, but even without it, it was very nice. Dried herbs work just as well, in case you’re freshly out. And there’s plenty of leftovers to save for another time.

INGREDIENTS:

2 Tbs. olive oil
1 Tbs. unsalted butter
2 large or 3 medium leeks (root and dark green parts removed), sliced crosswise (to yield 2 cups), washed, and dried
1 small onion, diced
1 tsp. coarse salt; more to taste
1 hearty sprig fresh thyme
2 bay leaves
Pinch cayenne
4 cloves garlic, thinly sliced
12 oz. Yellow Finn, Yukon Gold, or other medium starch potatoes, peeled and diced (to yield 2 cups)
4 cups homemade or low-salt canned chicken broth
2 Tbs. minced fresh flat-leaf parsley
Freshly ground black pepper to taste

DIRECTIONS:

HEAT the olive oil and butter until quite hot in a heavy-based pot. Add the leeks, onions, and salt, and then turn the heat to medium low. Add the thyme and bay leaf. Cook slowly, stirring occasionally, until the vegetables are slightly softened and a bit browned, 10 to 15 min. Add the cayenne and garlic; cook, stirring, for 1 min longer.

ADD the potatoes and chicken broth. Increase the heat and bring to a boil. Reduce the heat to a bare simmer, cover, and cook until the potatoes are tender, about 15 min. Discard the thyme sprig and bay leaf.

TRANSFER 1 cup of the soup to a blender to purée and then return the purée to the pot, or use an immersion blender to blend the soup to your liking. Adjust the seasonings.

LADLE into shallow bowls; garnish with the parsley, crème fraîche (if desired), and pepper.

Tuesday, February 22, 2011

Recipe: Peanut Butter Brownies


I can’t believe I forgot to post this recipe last year when I made these delectable Peanut Butter Brownies for Christmas. They were by far one of my favourite treats, and for those family members who also love peanut butter, these flew off the plate! I made them again this year, to much delight of said peanut butter lovers, and even though they are long gone now, just thinking about them brings back delightful and yummy memories. I might have to whip up a batch again soon. I shouldn't just have these once a year, heck no!

The one thing I will tweak next time round is to line the pan with tin foil, as getting these puppies out of the pan (and keeping them presentable) is a challenge in itself. I have NO problems, however, eating them straight out of the pan (which is how most of them were consumed this year…), and to enjoy them, it doesn't really matter how they look.

INGREDIENTS:

BROWNIES:
1/2 cup dark corn syrup
1/2 cup Butter
6 oz bittersweet baking chocolate, coarsely chopped
3 eggs
1 cup flour
3/4 cup sugar
1 tsp vanilla

FILLING:
2 cup chunky peanut butter
1/2 cup butter, softened
2 cup powdered sugar
1 tsp vanilla

FROSTING:
1/2 cup whipping cream
6 oz bittersweet baking chocolate, coarsely chopped
1 tsp vanilla

DIRECTIONS:

PRE-HEAT oven to 325. Line bottom of 13 x 9 inch pan with tin foil and grease with shortening and lightly flour, or spray with baking spray with flour.

HEAT corn syrup, 1/2 cup butter and 6 oz chocolate over low heat in a 2 quart saucepan, stirring frequently until chocolate is melted. Remove from heat.

BEAT in eggs, one at a time, using wire whisk. Add flour, sugar, and vanilla; beat with wire whisk until batter is smooth and shiny.

SPREAD in pan and bake 23-25 minutes or just until toothpick inserted in center comes out clean. Cool completely, about 45 minutes.

MEANWHILE, in large bowl, beat peanut butter and butter with mixer until blended. Add powdered sugar and vanilla; beat until smooth and fluffy. Spread over cooled brownies.

HEAT whipping cream and 6 oz chocolate over medium heat in 1-quart saucepan, stirring frequently, until chocolate is melted and mixture is smooth. Stir in vanilla. Cool 5 minutes. Spread frosting over peanut butter filling. Refrigerate until firm, about 1 hour.

Thursday, February 17, 2011

Seedy Sunday

Volunteering has been high on our To Do list this year, and when Matt’s Dad and Step-mom suggested that, in lieu of a Christmas gift to them, we volunteer and share the story instead, we were happy to take them up on it. Finding a place to volunteer, however, proved to be a bit more difficult. We have been thinking of Habitat for Humanity, which we are still looking into, but this frozen Canadian landscape is not ideal for building. In the meantime, we started looking for other opportunities. We found a local website online that sorted the current volunteer spots by the theme of the organization, and since we are big foodies, we searched in the food section to find a good fit for us. Matt found one that was tied into the Wychwood Barns (a local farmer’s market we were familiar with) called The Stop (www.thestop.org; their mission is to implement anti-poverty and anti-hunger programs). He e-mailed them to see if there were any upcoming events that we could participate in and, sure enough, they were helping with volunteers for an event called Seedy Sunday.  


So, this past weekend, Matt and I got up early (relatively speaking for a Sunday), had a quick breakfast bagel, got dressed, and then headed out to catch the first subway of the day (it’s amazing how quiet the streets are at 9am on Sunday!). Our destination: the Hart House at the University of Toronto, where the annual event was held (although we joined through the Stop, the event is actually hosted by Seeds of Diversity, a “Canadian volunteer organization that conserves the biodiversity and traditional knowledge of food crops and garden plants”). The event originally started as a way for local gardeners and farmers to meet and exchange seeds within the community. It has since grown to now include an area for vendors to come and sell their own products.

We had a few different tasks as volunteers. Matt began his day helping with set-up; assisting the vendors to bring in tables and stands and other necessary equipment for their booths. I spent the morning with another volunteer standing outside one of the entrances telling people they couldn’t park there. Luckily it wasn’t bitter cold out, and the other volunteer was friendly to chat with. After a while, we moved inside to see if we could be of more use there.

Our next task for the remainder of the day was to assist with the Seed Exchange table. Boxes were already organized with seeds that had been pre-packaged and were set out on the tables by category (fruits & vegetables, herbs, and flowers) for easy finding. The concept is that you can either bring seeds and take some new ones in exchange, or take seeds for a suggested donation of $2/packet (it was a pay what you can, so we weren’t too forceful in the $2 payments). Matt and I took the vegetable table, an ambitious move by two very non-gardeners (at home we have had 3 out of our 4 cacti die…). But we have hopes of one day having a little garden and growing some of our own vegetables, so we looked at this as an opportunity to learn. And learn we did. By mid-morning, the event was buzzing with people and our table had plenty of visitors. We did our best to answer questions where we could, but when we were stumped, Matt had the great idea to pull out our Blackberries to Google the answers (secretly, I think that made him the hit of the table!).


When we had a bit of a lull in the crowds, we would take turns popping into the room next to us where the vendors were set up. There were a lot of interesting booths, from ones providing info on urban gardening (we signed up for a mailing list or two), edibles for sale (fair trade coffee, local honey, etc.) and one highlighting all the summer farmers markets in the city (we’ve scouted a new one for next summer).


While it was a long day standing, we met a lot of very interesting people and learned quite a bit about some of the different vegetables out there. It has sparked an interest for both Matt and I to learn more about gardening and vegetables, and, to start, I picked up a few different varieties of seeds for our future garden. And next year, if we volunteer again, we’ll come better prepared with more knowledge on growing vegetables.

Monday, February 14, 2011

Recipe #5: Tortellini Soup with Carrots & Leeks


Photo and recipe courtesy of finecooking.com
It was just one of those Mondays where I felt like we needed soup for dinner. After the weekend spent at Tremblant, however, our cupboards were bare, and so shopping was in order. Luckily I was able to pop into a Longo’s on my way home from work (I found a small one along the PATH just a bit out of my way). I stopped in to pick up a a few items for the week, including the ingredients to make this Tortellini Soup.

I was also looking for a soup recipe that had leeks in it, so when I stumbled across this one, I was excited to give it a try. Leeks have a very mild flavour to them and belong in the same family as onions and garlic. "The taste might be described as a mixture of mild onion and cucumber, with a fresh smell similar to scallionIn its raw state, the vegetable is crunchy and firm" (Wikipedia).  After using them in this recipe with much success, I’ve since used them to make a simple brown butter and garlic sauce to eat with our homemade gnocchi, and have already bought more to make another soup this week.  

The nice thing about this recipe, too, is that by buying the prepared pasta already, the prep time/work is very minimal; really all you have to do is brown the leeks, garlic and carrot, then boil everything together. And I was very happy that this made leftovers, which I enjoyed later that week at the office.

INGREDIENTS

2 medium leeks (12 oz. untrimmed)
1 Tbs. unsalted butter
3 cloves garlic, finely chopped (about 1 Tbs.)
1/2 medium carrot, peeled and finely diced (2 Tbs.)
Salt and Pepper
1 box of low-sodium chicken or vegetable broth
1 package of fresh or frozen cheese or beef tortellini
1/4 cup freshly grated Parmigiano-Reggiano or Grana Padano (or what you have on hand)
1 tsp of red pepper flakes (if desired)

DIRECTIONS

TRIM the roots and dark green leaves from the leeks. Slice the white and light green part in half lengthwise and then slice the halves thinly crosswise. Rinse well and drain.

MELT the butter in a 4-qt. saucepan over medium heat. Add the garlic, leeks, and carrot. Season with a couple pinches of salt and cook, stirring occasionally, until tender, 5 to 7 minutes. (It’s fine if the vegetables brown lightly.) Stir in 1/4 tsp. pepper and red pepper flakes and cook for about 20 seconds, then add the chicken broth and bring to a boil. Add the tortellini and cook for 3 minutes. Reduce the heat to a simmer. Continue to simmer until the tortellini are cooked, 3 to 5 minutes.

SEASON to taste with salt and pepper. Portion the soup into warm bowls, top each with some of the cheese, and serve.

I believe the original recipe also included frozen peas, so if you're a fan, feel free to include.

Saturday, February 12, 2011

Finally Flying Porter!


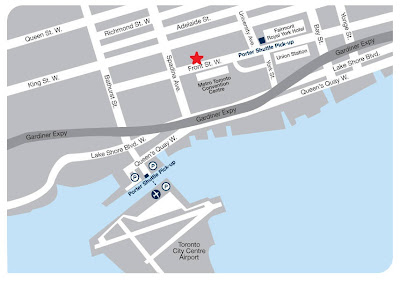
We live right down town and minutes away from the Island Airport (our house is the red star, below), so flying someplace with Porter Airlines has been on our list of things to do for quite some time. We’ve only ever heard great reviews of the service (even a friend who lost his skis said it was an awesome flight!), and the more popular the airline becomes, the more flights they have available. We weighed our options between renting a car and driving to Tremblant for a ski weekend (which we did two years ago when we had a car), but when we thought about the seven hour drive there and back (at least), the cost of renting the car, not to mention the cost of gas, flying became more and more appealing. We finally decided to go ahead and book our trip with Porter, and the closer the date got, the more excited we became.


Well, the weekend came quicker than we thought, and before we knew it, we were packed and ready to fly. Porter has expanded the number of flights they offer, so we were able to catch a departing flight at 7:45 Thursday night, arriving at 9:00 pm in Tremblant. And how many can say that they have ever walked to the airport?! Well, we practically did. We walked to the streetcar stop on Lakeshore and took it the few stops to Bathurst, and then just hoofed the rest of the short distance to the ferry waiting. The ferry ride…Ha. That lasted a whole of 2 minutes once we left the dock. Matt said there had been talk of building a bridge at one point, and we also hear murmurs from other travellers of an underground pedestrian walk way, both of which would make a lot of sense.

Check in was easy; no line-ups, and since we weren’t flying out of the country, the security check was fairly painless (yet we still had to remove our belts….). The lounge area is nicely arranged and offers complimentary tea and coffee, snacks, along with wi-fi and newspapers. Plus, you only have to arrive a minimum of 30 minutes before your flight, so you aren’t even there a long time, unlike international departures. The plane is a twin-propeller and seats 70 people (we learned from the on-flight magazine), and shortly after take-off, we’re again offered complimentary beverages and snacks, this time including beer and wine. We had just enough time to enjoy a glass before we started our decent not an hour later.


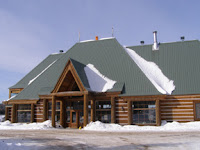
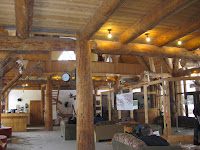
Arriving at the Tremblant Airport held a nice surprise of its own – it looks like a ski chalet! It was small and so very quaint and even had a fireplace to boot. It was just so welcoming that it really didn’t have the feel of any other airport we’d been to. The only line up was for those people looking to catch a shuttle to the mountain. Luckily we didn’t have to wait in that line. We were staying with relatives for the weekend at their chalet, and they were gracious enough to meet us at the airport. The ironic thing is, the drive for them to and from the airport was probably longer than our flight! Our hosts met us on the other side of the dividing glass wall (with a hand-written welcome sign for us – you rock, Megan and Doug!), and there was only a brief wait for our luggage as they unloaded it from the plane. We were then told to fetch it ourselves from the trolley, so even then we didn’t have wait at the baggage claim. It wasn’t long at all before we were on the road to settle in at the chalet for the weekend. After a beer or two and few Cheetos, we were ready to call it a night.

The next day, the four of us set out early for a full day of skiing at Mount Tremblant. Crowds were a bit lighter since it was a Friday, and it was a beautiful day for cruising the slopes. It had been two years since both Matt and I had been skiing, but we picked it up again rather quickly. The views from the top of the mountain were amazing! And if the wind wasn’t so blustery, I might have snapped a few photos, but I guess now you’ll just have to go and see for yourselves. On one of runs down, actually, there was an artist bundled up with his easel painting the landscape; that was a sight I wasn’t prepared to see. We stopped for a coffee after a few runs down the mountain, then back again. We finished up around one (we were a little sore a bit tired) and drove back to the chalet for lunch and a nap, both much needed. For lunch, Megan prepared a beef brisket that was very delicious (not quite Schwartz’s, but for making at home, very tasty!). I’ll be asking for the recipe, naturally. We then headed into town to pick up some groceries for the weekend and returned to relax, do some reading, more eating, play some euchre, and a simple pasta dinner. We were also awaiting the arrival of Erin and Brad and their girls; they were joining us for the rest of the weekend.


Saturday was much the same, only this time Megan stayed back with Erin and the girls and instead Brad joined us with his snowboard for a day on the slopes. Surprisingly, the crowds were not that terrible (we expected it to be busy on a Saturday), and the weather again was a great for skiing. We tried a few different runs that day, and instead of heading into the village for a coffee, we stopped at the “Refuge”, a cabin on one of the hills that serves warm and cold drinks, along with snacks. The cool thing is it has no electricity, so it’s very cozy with the fireplace. Doug was even kind enough to share his secret stash of Grand Marnier to add to our drinks. Yum! And after a few more runs, we met the rest of the gang for lunch in the village. A few more runs and we were done for the day, satisfied with the two days of skiing we had gotten in.

The rest of the weekend was spent mainly indoors playing cards, reading, or playing with the girls, and, of course, eating. Sunday afternoon we said our good-byes and departed for the airport for our journey back home. After check in and a small delay, we were back in Toronto, ready to head back out to a small Super Bowl Party. What a weekend!

Friday, February 11, 2011

Fat Friday – Enoteca Sociale

This week’s Fat Friday is a special collaboration with my wonderful husband. He wrote an article about Entoteca Sociale for his company newsletter, and with a few minor changes, I thought it was a great review for the blog. This was our second visit to the restaurant; the first time I was so hungry I neglected to take photos! But the food and ambiance only whetted our appetites for more, so we headed back, this time with Matt’s mom Diane when she was in town.


Enoteca Sociale is a recently opened Italian restaurant located on Dundas West, just off of the Ossington strip. We’d been looking forward to trying it since reading numerous good reviews in its first few months of operation (plus, our great experiences at the owners’ first restaurant, Pizzeria Libretto, made us optimistic). Well, in the name of getting the scoop for you loyal readers, we’ve sacrificed a lot to make sure we went twice in the last couple months.

The results: we can vouch for Sociale and their tasty rustic Italian dishes. In addition to the usual courses (Antipasti, Pasta, Mains) that you can enjoy off the menu a la carte, there is also a 5 course tasting menu for $45. The first time we went, Matt had been set on that tasting menu but was sadly informed that they had just served the last one (they serve them until the ingredients run out). Although crushed, he quickly recovered to sample some other great dishes plus a healthy amount of wine from their extensive wine list (ah, the life of us TTC-ers; never having to pick a DD for the night) and we both left full and satisfied.


On that first visit, we discovered an amazing starter: it was called Arancini con Stracciatella (above), which we assumed was something with oranges (since in Italian, arancia means orange). Turns out that the dish was actually deep fried balls of risotto, which was every bit as amazing as you would imagine something that was a deep fried ‘surprise’ would be (I’ve since discovered the recipe to make at home, although it has yet to be attempted for lack of deep fryer). The pastas were also very good, from the All’Amatriciana (a good kick of spice) to the Cacio e Pepe (cheese and pepper on pasta; simple but delicious).

The second time we went, Matt made sure he had the tasting menu (you can request it when you make a reservation) and was not disappointed – the highlight of which was the heavenly House Made Squash Ravioli with Brown Butter and Candied Pecans. The fourth course in the tasting menu is a cheese course – a great break between the main and dessert (the cheese comes with accompaniments like crostini, preserves, etc.). Even without the tasting menu, your cheese options are endless as this restaurant has its very own cheese cave (you can even host private parties in there)! The only course that didn’t knock his socks off was dessert (I don't actually see a dessert listing on their menu, but I think it was a  cake of some sort with plums) – not that it was bad, he was just quite full by the time it arrived (I guess in a clothing analogy, belt loosening trumps the sock knocking?)


And for myself, I ordered the Arancini con Stracciatella again as my starter and decided on the Carbonara (below left) as my main. Diane also indulged in the same starter (we had been talking them up all day!) and the Cacio e Pepe (below right) for her main. We both enjoyed our meal and watched in awe as plate after plate arrived for Matt to enjoy. 


The atmosphere is intimate but not crowded (reservations are taken but ½ the tables are kept unreserved to accommodate walk-ins). It’s upscale but not too expensive (like some downtown restaurants): pastas in the $12-$15 range, mains with one side $20-$24. The bottom line: the delicious food, ample wine list and upscale-yet-casual vibe will keep us going back (plus the fact that they have a cheese cave – I mean, come on, who has that?!)

Tuesday, February 08, 2011

Recipe #4: Homemade Cinnamon Rolls


Coming up with a new recipe this week was rather challenging. Our busy schedule meant we were eating out a couple nights during the week, and the free nights we did have at home generally called for quick and easy meals. Plus, we were flying out on Thursday night to Tremblant for the weekend (more on that later this week), so that also meant no homemade meals over the weekend (we’d have to settle for cheese and bread and beer. Aw, shucks!).

But I did think that I should at least bake something to bring along with us for our hosts and other guests at Tremblant and decided on Homemade Cinnamon rolls. Chef Michael Smith (Chef at Home) created this recipe (another winner!) and the picture was just too tempting to resist. Plus, making them ahead of time meant I could easily pack them in my suitcase. I actually made them over two days; first preparing the dough on Tuesday and letting it rise and then rest in the fridge overnight, and then rolling it out and baking them the next night after work. The only substitute I made to this recipe was to use Soy Milk in place of whole Milk in the dough recipe, but I don’t think anyone could taste the difference.


If you believe it, I actually measured and trimmed the dough to size when I was rolling it (using a tape measure and all!), so my cinnamon log was exactly the right length, and after cutting them into individual rolls, I ended up with about 18 of them (below left). After trimming to size, I had extra dough, which I rolled again to make a smaller log. This time, however, I got creative and spread with a mixture of peanut butter and honey (below right)! First spread on the peanut butter and then drizzle with honey. Smooth over the surface to combine and then roll. I’m not sure how well they turned out yet; I did cut them a little bit bigger than the cinnamon ones, and that means they will be a bit doughier. We haven’t had a chance to taste them yet, but I’m thinking I need to bring one for breakfast tomorrow.


Sadly, the glaze never actually made it with us as I couldn’t find a good way to transport it, but it sits in the fridge at home to use on the few rolls we put in the freezer for a later date.

It turns out these little rolls are not only a good breakfast treat in the morning, but they make a great snack to wrap and put in your ski jacket pocket, as our host Doug so cleverly thought up.

INGREDIENTS

DOUGH
1 cup milk
1/2 cup butter
1/2 cup brown sugar
1 tablespoon vanilla
1 teaspoon salt5 cups flour
1 package instant yeast
4 eggs

FILLING
1/2 cup butter, room temperature (or even melted)
1 cup brown sugar
2 tablespoons cinnamon

GLAZE
1 tablespoon vanilla
4 tablespoons cream
1 cup powdered sugar

DIRECTIONS

FOR the filling, mix all ingredients together and set aside.

FOR the glaze, stir together the vanilla, cream and powdered sugar until smooth; set aside.

WARM the milk in a small pot gently along with 1/2 cup butter, 1/2 cup of brown sugar, the vanilla and the salt. Don’t bring to a simmer, warm just enough to melt the butter.

MEANWHILE, measure half the flour into the bowl of a stand mixer along with the yeast. Add the warm melted milk butter mixture to the flour and beat with a paddle attachment until smooth. Add the eggs one at a time, beating until smooth before proceeding.

SWITCH to a dough hook and add the remaining flour. Knead until a soft dough forms that is no longer sticky to the touch, about five minutes.

REST the dough in a warm place, covered in a lightly oiled bowl until it doubles in size, about one to two hours.

KNOCK the dough down and let rest for a few minutes. Flour your work surface, the dough, your hands and a rolling pin. Roll out the dough into a long rectangle shape, about 18x12-inches.

EVENLY spread the cinnamon butter over the top of the dough leaving an inch or two uncovered along one long edge. This will help a seal form. Roll tightly into a long cigar shape from the covered long edge to the uncovered long edge. Brush the outside of the log with oil or melted butter.

SLICE the dough log into 12 or 18 sections. Turn each on its side and position evenly in an appropriately sized lightly oiled baking pan. Rest, uncovered, until the dough doubles in size again and the rolls swell into each other.

PREHEAT your oven to 350 F. When the dough is ready, bake for 30 to 35 minutes. Remove from oven and let cool on pan.

When the cinnamon rolls have cooled enough to handle, drizzle the prepared glaze all over them. Serve immediately!

NOTE: I’ve decided that since I made up this New Year’s Resolution of one new recipe a week, I don’t have to stick to dinner meals; desserts and snacks also count. And now that I’ve found another new recipe site (http://www.finecooking.com/), which has a daily newsletter, it’s getting a bit easier to find new ideas. My BusyBeeBets Kitchen is certainly expanding (as is my waistline…).


Thursday, February 03, 2011

Ice Skating

I’m not generally one of those people who complains about how cold it is in the winter (at least not to that many people). I love watching the snow fall, collecting into piles along with window ledge or rooftops. We do live in Canada, after all, and the cold and the snow is what we’re known for. Sure, when it’s minus 30, I am more than happy to stay bundled up indoors, and extremely happy for my convenient underground walkway to the subway, but on those occasions when the sun is shining and the cold is bearable, the winter is great for outdoor activities. And this past weekend was one of those days that made for a great winter adventure.

As a kid I remember my dad building an ice rink in our back yard. He spent hours after work and on weekends flooding it and levelling it (and we spent hours asking, “Is it ready yet?”), until finally the surface was frozen and smooth enough for us to skate on. We bundled up, strapped on our skates, and that’s where we learned to glide and stop and turn. And we’ve been skating ever since. As an adult today, I think skating outdoors is such a great family/couple activity, but the reality is, we don’t do it all that often. Seems like life keeps getting in the way, unless you schedule it!

That’s exactly what we did this past Sunday. As a Birthday Surprise Adventure, I planned to take Matt ice skating for his birthday (we've been talking about going for probably two years now!). With various rinks around town to choose from, first I had to narrow down where to go. Nathan Phillips was an obvious choice for its location, but it’s also very popular with the locals and tourists and I didn’t feel like fighting the crowds. I had the same thoughts about the rink at the Harbour Front. And then my mom sent me a link to an article about a recently opened ice rink in Colonel Sam Park in Etobicoke, and after checking it out, that’s where we were headed. I borrowed skates from my dad (and he was even kind enough to have them sharpened!), hoping they would fit Matt, and whipped up a thermos of hot chocolate to enjoy after the skating, along with a few other snacks. We hopped into the car (a little luxury we have for the month of February) and drove off for our adventure. Matt was the one driving, but I only gave him general directions as to where we were headed. I’m pretty sure once we pulled into the parking lot he had figured it out (kind of hard not to when you see the rink and the people skating about).


The Colonel Sam Skating Trail is unique in that it’s shaped like a figure eight, and you can either skate the long way around both loops or take a short cut through the middle. A big bonus is that the rink is artificially frozen (great for our fluctuating temperatures) and Zamboni-ed regularly to keep the ice smooth. Plus, there is a heated change room with cubby holes for your boots, if you prefer, but also benches outside along the rink.


It was a prefect sunny afternoon for skating - not too cold, and the warmth of the shining sun actually kept us quite comfortable. Both Matt and I were a little rusty in the beginning, but after a few laps around we got the hang of it. There were lots of families and couples, as I suspected, but lots of room for all of us to share the ice. Once we had enough, we wandered back to the car where hot chocolate laced with butterscotch awaited us (the butterscotch was from a coffee syrup that I used in place of sugar). We finished off the afternoon with a car wash, a visit with a friend in the neighbourhood, and an Americano at a new coffee bar by our house. Oh, and we topped it off with the last of our wedding brisket to enjoy Montreal Smoked Meat Sandwiches for dinner (I also gave Matt another brisket for his birthday, so we'll be able to enjoy that throughout the year). All in all, I would say the day was a success!


Tuesday, February 01, 2011

Recipe: A Quick Spinach Dip

Photo courtesy of masterfile.com
If you’re looking for a yummy appetizer to serve to guests, this is a great little dip that mixes up in no time and requires only a few ingredients from the grocery store. I know there are tons of these recipes out there, but after having this one at Diane’s house, and finding out it wasn’t mayo based, well, that was enough for me to scoop the recipe and share it today.

The key secret ingredient is the powdered Ranch Dressing mix that you add to season the dip. It really adds such a nice flavour of onions and other spices; I didn’t even know such a mix existed until I was introduced to this recipe. It’s been a long while since I made this, but since we were hosting the January Birthday Dinner, I thought this would be a quick appetizer to serve up while the rest of the food was finishing up. And since you only have to microwave it, you only have to dirty one bowl to serve. I opted for bagel chips and pita chips for dipping (both are good and sturdy), but bread or other chips would also be a great substitute.

INGREDIENTS

1 pkg cream cheese, softened
1 cup sour cream
1 pkg frozen spinach, thawed and drained
1 pkg Ranch Dressing Mix
1 cup shredded cheese (your choice)

DIRECTIONS

COMBINE all ingredients in a microwave safe bowl and heat on medium-high power for 2-3 minutes. Stir and heat again, if necessary, until smooth and creamy. Serve with your choice of chips, crackers, or bread.

This can easily be refrigerated if any leftovers exist after your guests leave, and simply reheated to snack on later. It would also be interesting to experiment with other seasoning packets, if any others exist. I was only looking for the Ranch one, but have since seen recipes that include soup mixes (onion or leek), for example, so other Dressing mixes might also be out there.


LinkWithin

Related Posts Plugin for WordPress, Blogger...