Wednesday, March 30, 2011

Bread Diary – American-style White Sandwich Bread


It may have been a looooong while since I’ve given you a bread update, but, in fact, since I received that bread book for my birthday last June, we haven’t bought a store-baked loaf since (ok, maybe here and there the odd time). I try to make bread regularly each week. One batch gives us for two loaves; I mix the batter Sunday afternoon, let it rise, then pop the first loaf in Sunday evening and store the remaining dough in the fridge. The next weekend, I put in the second loaf to bake. I actually have it down to quite a science and for the white bread version we usually eat, I don’t need the recipe any longer.

Matt and I are both creatures of habit, and our weekday breakfasts/lunches are fairly plain and simple: a homemade oatmeal or banana muffin to start the day, and a peanut butter (and honey for me) sandwich, an apple, a yogurt, and we’ve got ourselves a lunch. It might sound bland, but we don’t need fancy lunches at the office every day. Plus, the homemade bread makes it special.

Well, it was time for a change, and while I enjoyed the usual white bread, I was looking for a recipe that was a bit lighter; the usual one was kind of dense (but good). Luckily, the bread book has no shortage of recipes, so when I came across the recipe for the American-style sandwich bread, which promised to be a lot lighter, I was excited to try it out. The recipe didn’t differ much, except for the addition of an egg and some sugar, and preparation was exactly the same. The result, a really nice and light sandwich bread for our peanut butter. I was happily impressed and continued to bake it for a couple weeks.

Baking our own bread, we like to think, is saving us some money, but lately we’ve been wondering if it’s worth the effort. I mean, a loaf of fresh bread from the bakery is about $3.00. So, that’s about $6.00 for two weeks. If you take into account the ingredients that go into the fresh loaf, it probably does work out to be less than $3.00 a loaf, but we found out this weekend that lugging home about 15 kilos of flour (it’s better to buy in bulk) has a cost in itself (like a grumpy husband with a sore back…). I’m thinking I might be ready to leave the fresh bread for weekend dinners.

Monday, March 28, 2011

Crafty Find: Yarn Bombing

Have you heard about this? Perhaps you've seen it around town. Maybe you have no idea what I'm talking about! This week’s crafty find is all about yarn bombing.

I stumbled across some great examples when I found this little gem of a site (knithacker), which encouraged me to do a bit more research on the topic. I had seen pictures before on the web that had always peaked my interest, and a quick Google image search will reveal plenty to take a look at. I’ve include a few good ones to whet your appetite, but feel free to follow the link for a bigger collection. They come in all shapes and sizes; some are big undertakings, while others just leave a little piece behind.  

 According to Wikipedia:

“Yarn bombing, yarnbombing, graffiti knitting, guerrilla knitting, or yarnstorming is a type of graffiti or street art that employs colorful displays of knitted or crocheted cloth rather than paint or chalk. While yarn installations – called yarn bombs or yarnstorms – may last for years, they are considered non-permanent, and, unlike graffiti, can be easily removed if necessary. The practice is believed to have originated in the U.S. with Texas knitters trying to find a creative way to use their leftover and unfinished knitting projects, but it has since spread worldwide.”

The most recent yarn bomb I’ve seen includes some clever marketing, using a QR code that smart phone users can scan to get more information. I think this is such a great way for artists/crafters to differentiate themselves.

I’m sure there is much more I could share with you on the subject, but I’ll leave you with this last piece of info: June 11th is International Yarn Bombing Day. I’ll be keeping an eye out for some knitted graffiti; perhaps you’ll do the same near you. It might be fun to join in with the spirit of the day and leave a little something behind, too. Looks like I have a bit of time to think about it. Anyone want to plan something together?

Friday, March 25, 2011

Recipe #10: Poblanos Stuffed with Cheddar and Chicken


This is NOT how mine turned out...
I was very excited to try out this new recipe, which I had been saving for a couple of weeks now. I wasn’t sure I would be able to find poblanos in the super market, but while we were in Kensington last weekend, we found a little Mexican grocery store that had poblano peppers, and much, much more!
I love that Kensington has niche grocery stores that cater to a specific nationalities. I love browsing the shelves to see what unique products are offered, what neat snacks and treats are hidden in the frozen section, and what unexpected canned item might turn up next to a regular old can of beans. The vegetables are often very interesting, and many I’m not sure I’ll ever dare to eat… but maybe one day.

Cooking this recipe meant this was also the first time I had tried roasting peppers, blackening them in the oven to char the outside in order to peal it away. I was actually a little excited about this part. But the end result didn’t turn out as pretty as I had hoped; roasting the peppers also makes them very soft and flimsy, so they weren’t so much a stuffed peppers, more like a pepper carefully folded over the chicken stuffing.

With already prepared shredded chicken, roasting the peppers and cooking the rice was the extent of the actual cooking, so it was a fairly quick meal to prepare. The filling was really quite yummy, and I would have eaten this on its own, but when combined with the pepper, it gave a really nice smoky flavour with a bit of heat.

INGREDIENTS:

4 large poblano chiles
2 medium tomatoes, chopped
1/2 medium white onion, chopped
1 large clove garlic, chopped
1 tsp. dried oregano, crumbled
1 tsp. ground cumin
Generous pinch ground cinnamon
Kosher salt
1 Tbs. olive oil
2 cups shredded cooked chicken, preferably dark meat
1-1/2 cups cooked brown or white rice
2 cups grated sharp or extra-sharp white Cheddar (about 7 oz.)
1/4 cup chopped fresh cilantro (including some tender stems)
1 Tbs. lime juice

DIRECTIONS:

Position an oven rack about 4 inches from the broiler and heat the broiler on high. Line a large rimmed baking sheet with foil.

Slit the chiles from stem to tip and set on the baking sheet. Broil, turning every few minutes, until blackened all over, 5 to 8 minutes. Let cool slightly, peel off the skins, and cut out the seed cores, leaving the stems on. Turn the chiles inside out, flick out any remaining seeds, and turn right side out. Return the poblanos to the baking sheet.

Purée the tomatoes, onion, garlic, oregano, cumin, cinnamon, and 1/2 tsp. salt in a food processor. Heat the oil in a 12-inch skillet over medium heat. Add the purée and cook, stirring frequently, until the liquid has evaporated and the mixture looks thick and pulpy, 8 to 11 minutes. Remove the pan from the heat. Stir in the chicken and rice, and then 1 cup of the cheese, the cilantro, and the lime juice. Season to taste with salt. Divide the filling among the peppers, wrapping the sides of the peppers up and around the filling, some of which will still be exposed.

Broil the peppers until the cheese is melting and the top is beginning to brown, about 4 minutes. Top with the remaining 1 cup cheese and broil until the cheese is completely melted, about 2 minutes.

Wednesday, March 23, 2011

Fat Friday - Trevor's Kitchen

Twice a year Toronto hosts two annual events involving food – Winterlicious and Summerlicious. We’ve been a fan of both events, so when the list of restaurants are announced and the menus go online, we always check out to see who’s participating and who’s offering what. With fixed price 3 course menus for both lunch and dinner, this is a relatively inexpensive way to try out new restaurants around town. Mainly we look for the restaurants that offer some sort of steak dish, or if not steak, options that both Matt and I will enjoy. This year we only managed to make it out once.

We found ourselves at Trevor’s Kitchen one Friday evening, a quaint (read: dark and not good for taking photos; I’ve had to Google a few to include) little restaurant in a basement on Wellington Street East. With a selection of tables, spots at the bar, and a couple couches for larger groups, there was plenty of room for guests. Tables were set a tad close together, but that just lets us see what other people are eating and eavesdrop on interesting conversations… A group of women (early 20’s) were gathered in the couch area having drinks and appetizers, which I thought was a neat spot for a little get together. It wasn’t until we left that we noticed that there was a whole other section of tables, making the place about double the size I first thought.

Their menu online was very good, and we actually had a tough time deciding between the options. Most places will offer a choice of three to four options for each course, but Trevor’s had at least five, and I would eat almost all of them, which is saying a lot. I knew I liked this place when I read macaroni and asiago cheese and goat cheese poutine.

 For round one, I simply had to have said macaroni and asiago cheese; how could I not? But it was a close race between the potato and leek soup with roasted garlic and aged cheddar. The small portion I enjoyed was divine; some of the best I’ve eaten in a restaurant. Matt started with the seared diver scallop and slow roasted pork belly with frisee salad and truffle mustard (long name for a starter…). Both were very good, and I won’t lie, I would have liked to order that mac and cheese as my main, too.

 For round two, Matt enjoyed the Surf & Turf, consisting of jumbo wild prawn, Alberta sirloin steak and goat cheese poutine. He was kind enough to let me try the poutine, and oh my goodness, it was heavenly! The goat cheese lent such a mild flavour to it, and it was topped with chives, which made it taste like sour cream and onion seasoning, but on French fries! I had to stop eating it to make sure he enjoyed it, too. My second dish was a Crispy Chicken Confit with a cheddar pierogi, sweet potato and buttermilk gravy. The combination of everything together tasted just so darn good, even though I’m not a huge fan of sweet potatoes. I guess the trick is to smother them in buttermilk gravy.


And finally, for round three: dessert. Just when you think you can’t possibly squeeze another bite in, they bring out a wonderful plate of sweetness. To be honest, I don’t actually remember what I had, but looking at the menu I think there is a fairly good chance I had the dark chocolate and caramel torte with peanut butter Chantilly (yup, that definitely sounds like something I would eat). And for Matt, I believe he had the crème brulee. We swapped bites of eat, and, just as the prior two courses before, we were not let down. I commend Trevor’s Kitchen for putting together such a wonderful sampling of their menu, and all at lovely price of $35.

As we finished the last of our desserts and enjoyed our last few sips of our red wine, we marvelled at how full we were and how good the food was. Not long after, the waiter brought over the cheque and a little after dinner treat. But unlike traditional dinner mints, he brought out a bowl of….wait for it….. blue cotton candy! That full belly we thought we had, well, there was certainly room for the cotton candy.


We walked by Trevor’s this past weekend to check out their full price menu; it is a little on the pricey side, but now that we’ve been, if they are on the Winterlicious list next year, I’d go back in a heartbeat!

Tuesday, March 22, 2011

Vanilla Update


A little more than 2 months ago now, I wanted to try and make my own vanilla extract. I found a simple recipe online and then went out to find the vanilla beans (that took a little more work than finding the recipe…). Back home, I sliced them, put them in a neat recycled an old bottle, added the vodka, and it really was as easy as that. The hard part was waiting for the vodka to extract all the flavour.

Well, as you can see, the liquid has darkened significantly, and the smell inside is delightfully wonderful! The longer it sits, the stronger the flavour develops, but having waited long enough, I decided to add a couple tablespoons to a fresh batch of banana muffins to enhance the flavour. I’m not completely sure that the alcohol has dissipated, or even if it’s supposed to, but I don’t think that affects anything once you bake it.

It was a little hard to taste a difference between the homemade version and the artificial flavouring I usually use; I think I might need to find a different recipe that specifically tastes like vanilla. Back to the internet!

Monday, March 21, 2011

Crafty Find: Up-inspired House


If you loved (or heard of) the Pixar movie UP, you might like to check out this new UP-inspired photo shoot by National Geographic. They've re-created a real life version of the animated version using a real house and real balloons.

Up was a great example of an animated movie that's both entertaining for kids and adults alike. The emotional depth that the movie conveyed was exceptional, and the musical montage during the movie was worth a lifetime of words. If you haven't seen this movie yet, put it on your list. You'll enjoy if you're 6 or 60.

Wednesday, March 16, 2011

Recipe #9: Banana Walnut Bread - Mini Loafs


I’ve never really been a big fan of banana bread, but the other day we had a couple spare bananas sitting on the counter and I thought it would be a great chance to try a different version of a weekday morning breakfast snack. I like to bake up a batch of either muffins or corn bread on the weekend and then toss them in the freezer. We each grab one in the morning to take to work, then pop it into the micro for a few seconds to warm it up. We have really been enjoying the Oatmeal Carrot Muffins for a while now, but it’s always nice to mix it up a little.

The recipe I found was a simple one (in the Better Homes and Gardens Cookbook, which can also be found online), and instead of making one loaf, I divided the batter to make 7 (not quite enough for 8) individual mini loafs. And, because I had some sitting on the counter, I added walnuts for a bit of crunch. I also substituted out the ¼ cup of vegetable oil with ½ cup of yogurt (usually vanilla, but a flavoured one could be a nice compliment). This helps reduce the fat content and keeps the bread moist.

I made this recipe again this past weekend, and when I looked at the page opposite, there was an actual recipe for Banana Walnut Bread, and I was surprised at how much this one differed. I was stubborn and still made the other version and still added the walnuts. And I still only got 7 loafs out of it… maybe I should try the other version next time.

INGREDIENTS

1 1/2 cups flour
1 1/2 tsp baking powder
1/4 tsp baking soda
1/4 tsp cinnamon
1 egg
2-3 mashed bananas
3/4 cup sugar
1/2 vanilla yogurt
1 tsp lemon zest
1/2 cup chopped walnuts

DIRECTIONS
PREHEAT oven to 350 degrees.

MIX all dry ingredients, not including the sugar, in a bowl together.

MASH bananas and mix with sugar, egg, vanilla, yogurt, and lemon zest (optional). Fold in chopped walnuts.

POUR into a loaf pan sprayed with cooking spray (or muffin tray with paper linings), and bake for 50-55 minutes.

Monday, March 14, 2011

Crafty Find: Knitted Chair & Ottoman Covers


Is this not an amazing creation for your home? I stumbled across this item while browsing my usual craft blogs. It's sold on Esty, and if you want one for yourself, she'll knit one to your chair's specifications. Mind you, she's based out of South Africa, so be prepared for some hefty shipping costs.

She also has an ottoman cover to match.


I immediately want to knit one for myself. I don't have a chair in mind, yet, but this would be such a conversation piece in your house. I'm going to add it to my pending project list, which keeps getting bigger.

I love the creativity that crafty people have, and there are certainly a lot of them out there. I've never really of thought of myself a designer but rather a crafter; I don't seem to have that certain creative quality. But I can follow directions and patterns, and I do have a bit of imagination of how to make a project my own. So I really love to see what other people are doing with their talents...and then maybe borrow an idea or two for my own...

Friday, March 11, 2011

Recipe #8: Pasta with Parmesan, Italian Sausage, Sundried Tomato, and Broccoli


This new recipe was cooked FOR me by my lovely husband for our most recent Valentine’s Day. Instead of going out and eating at an expensive restaurant, Matt suggested he cook dinner for the two of us. Frankly, how could a girl turn that down? Even feeling under the weather, Matt toughed it out and whipped up a really nice meal for the two of us to enjoy together.

He decided to keep me in suspense for this meal. I wasn’t allowed in the kitchen during preparation, and even while grocery shopping he was very clever at getting the ingredients without me noticing. It wasn’t until the dish was plated that and put in front of me that I knew what we were having. And it was delicious! I wouldn’t have thought to put together these ingredients but they all worked really nicely together.

I also love that Matt reached out to his mom for suggestions on what meal to prepare (hope he doesn’t shoot me for sharing this). She sent him an email from the 20-minute Supper Club (http://www.20minutesupperclub.com/) with a week’s worth of dishes to choose from, and he was able to find one that he liked. I’ve since joined up for that weekly email, because, well, quite honestly, I like getting recipes delivered to my inbox.

I know that Matt knows how to cook, and he often asks if he can help in the kitchen, but I actually really like to cook, so I don’t think of it as a chore for me. I really do get excited about coming home from work and trying out a new recipe and tasting how it turns out (nerdy, I know). But there certainly are some nights when it’s equally nice to come home, throw the leftovers on the stove top and just relax on the couch. Or to have someone else cook for you.

INGREDIENTS

Whole wheat spaghetti pasta (enough for 2 people)
12 sundried tomatoes (approximately)
1 tbsp olive oil
2 garlic cloves, minced
2 mild Italian sausages, castings removed
2 cups broccoli pieces
1/4 cup chicken stock
1/2 cup grated Parmesan cheese plus a bit more for serving

DIRECTIONS

COOK pasta according to package directions until al dente. Just before al dente, add broccoli and cook until crisp tender.

REMOVE broccoli and run under cold water. Set aside. Drain pasta, put back in pot and set aside.

PLACE olive oil in a large sauté pan over medium heat, and once hot, add garlic and Italian sausage, break into pieces, and cook until sausage is browned.

ADD broccoli, chicken stock, tomatoes and drained pasta. Toss to heat. Add cheese and toss a bit more. Season with salt and pepper to taste then serve with extra Parmesan cheese.

Thursday, March 10, 2011

Fat Friday - Porchetta & Co.


It seems I’m a little tardy in blogging about some of more recent Fat Fridays adventures. As the weeks seem to book up with basketball and visiting family and friends, we aren’t great about getting out every Friday to try something new, but we still manage to eat out often enough. Besides, with trying to cook one new recipe a week, I need to make sure that we’re home to eat in.

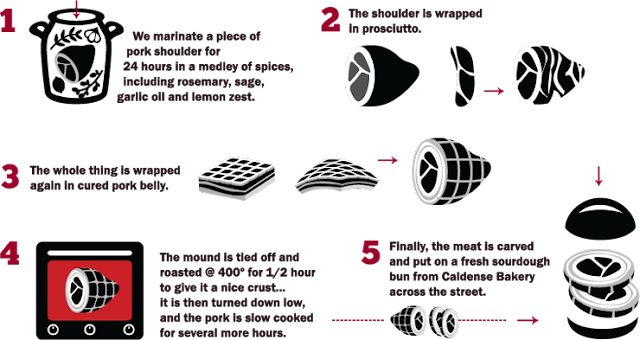
But on our list of new places to try was this small sandwich shop along Dundas West, called Porchetta & Co. and when I say small, I mean it. With only 4 stools beneath limited counter space, it really is more of a take-out diner, but on this particular night, the weather was blustery and snowy, so luckily we were able to nab 2 of the stools. Small also refers to their menu items; this place offers just two main options – the Porchetta sandwich or the Porchetta platter. There is a selection of sides and toppings, however, if you’d like to mix it up.

So what’s different about Porchetta & Co? Is it not just another pulled pork sandwich? No, my friend, it is not. If you head to their website, the home page describes how their pork is prepared and cooked. Three kinds of pork go into this sandwich and create a mix of both soft and crunchy meat. Take a look below at the process:


It was amazing to walk into the smells of this place, especially as the cold weather chilled our bones (it was a long streetcar wait…). The steaming of meat going on made the windows foggy and the air warm, and it just smelt so darn good, which only added to the wonderful sandwich we enjoyed. It wasn’t long before we had devoured our meal. The crunchy bites of bacon were always a surprise when we bit into one, and the mustard (house made, I believe, in either grainy or regular) was a nice addition to cut through the saltiness of the meat. I really liked the side of roasted potatoes; a pleasant substitution for regular fries. Even with only one thing on the menu, I’m sure we’ll be heading back. And their logo is just so darn cute!

Tuesday, March 08, 2011

Winterlude in Ottawa

Photo from February Snowmageddon
As this cold weather still lingers in the air, promises of warm and sunny days linger in my mind. But in the meantime, the snowy days and frosty nights do bring a certain charm of their own. Why not make the most out of these cold winter months and the activities that they provide? Frozen ice pads for skating and snowy hills for tubing and skiing are all great activities that have a limited time in this country. And heck, you can do both for free!

With Family Day falling in the dead of winter (a greatly appreciated holiday indeed), Matt and I decided to pack a bag and head to Ottawa to visit Erin and her family for the weekend. The Friday we left, it was actually quite a mild day; the sun was shining, perfect for a long drive. If you’ve done that drive before, you’ll know that they had to blast their way through rock to run the road through there, leaving behind a beautiful stretch of landscaping. As we drove through that stretch of road around Kingston, we saw water just gushing out between the rocks as the snow began to melt, and some pretty rapidly. While it was very cool to see, it also made us think that our plans for the weekend might be spoiled.

This particular weekend happened to be the last of the annual Winterlude Fest, and with the mild weather we had that week, we weren’t sure how many of the activities would be open. And then came an extreme cold snap, and the just-melted snow was now freezing while we slept. We had packed our ice skates in the hopes of perhaps gliding on the Canal, but, even with the cold snap, we learned it would be closed both Saturday and Sunday. Better safe than sorry; there’s always next year.

But other activities were still open. Saturday afternoon we bundled everyone up and headed to Rogers Crystal Garden at Confederation Park to see the ice sculptures. I wondered if the warmer air would have melted any of them, but most seemed to be in good shape. There are some very talented artists in Canada; the sculptures were amazing! But with the chilly air blowing in our faces, we stayed only long enough to see the sculptures and enjoy a Beavertail (a local treat) and some Snow Taffey before heading home to a warm house for the rest of the night.

Sunday morning we got up bright and early, jumped in the car and drove to Jacques-Cartier Park to play at the Snowflake Kingdom. Erin, having two kids, knows that the earlier you get there, the less busy it will be, so we were there shortly after the park opened. We started our day taking a tube ride down an ice covered hill, but after that first run, and the newly formed ice, for safety reasons they closed the run for the morning. Luckily we got our ride in first. Next, it was on to the snow hills, man-made mounds of packed snow that kids and adults slide down on their snow-pant-padded bums. This is fun for the whole family, as the younger kids can ride down with their parents, and the older kids (like Matt and I) can go on our own.

As the morning wore on and we tired of the sliding, we stopped inside a heated tent to enjoy yet another Beavertail. Deep fried dough covered in sugar - yes, please! Did you know they come in a selection of flavours, both savoury and sweet? I didn’t, but I do now. We ate them up and then slowly made our way back to the car, stopping here and there to see some other small attractions (a giant inflatable beaver, an accordion-playing snowman, a very large deck chair), and then headed back home for a nice afternoon nap, adults included.


I remember my parents taking me and my siblings to Winterlude as young kids, probably during one of my brother’s hockey tournaments in Ottawa (and, as I know my memory is not that great, this is surely incorrect. My mother can correct my errors). I remember the bitter cold but also the fun that we had. That year (late ’80’s perhaps) we did get to skate on the ice, but as our toes quickly froze, we didn’t last long. I remember watching my dad and brother learn to play sled hockey, where, seated in a sled, you must propel yourself along with two pointed sticks. I remember it being a fun weekend, but I wonder if my memories are different from my parents, who surely heard “I’m coooooold!” many, many times.

We drove back Monday afternoon, a little more tired than when we left (but that’s life with kids, so I’m told), and as we did, we arrived at a very different scene along the highway. The gushing water we saw just days before was now frozen solid in giant icicles. I wish I had snapped a photo, because it sure was a beautiful sight. While I'm anxious for spring to get here, I'm enjoying the winter while it's around.

Wednesday, March 02, 2011

Recipe #7: Herbed Roasted Pork Tenderloin


For this new recipe, we had decided one Saturday night that we’d like a pork tenderloin dish, and so off I went in search of a recipe. I had forgotten about a new cook book I received for Christmas, so I pulled it out and flipped through the pages. I was happy to find this recipe, exactly what we were looking for.

On the note about the new recipe book, it was a gift from Erin and Brad this past Christmas, and it was an edition of America’s Test Kitchen Cooking for Two. I had blogged about borrowing a similar version from the library a while back, so they might have gotten a hint from there. The book is really useful; not only does it have a great variety of recipes, but it gives helpful tips for new cooking techniques. It also gives ideas on what to do with leftover ingredients, say, if a recipe only calls for a half a bell pepper. They call it “Use it Up Recipes”; so clever!

This recipe was fairly easy to achieve, and not only did I get to try a new recipe, I also got to try out my new IKEA meat hammer (thanks, Jeff, for picking that up for me). What better way to take out some stress than on defenceless pork tenderloin? The results were delicious, too. Oh, and I discovered that if you don't have kitchen twine on hand, cotton yarn works just as well!

INGREDIENTS:

2 tbsp butter
4 tsp whole-grain Dijon mustard
3 cloves garlic, minced
2 tsp fresh thyme
2 tsp fresh sage
1 tsp lemons zest + 1 tsp juice
1 pork tenderloin, trimmed
2 tsp veg oil
3 or 4 pieces of kitchen twine

DIRECTIONS:

PREHEAT oven to 400 degrees.

MASH together in a medium sized bowl the butter, mustard, garlic, thyme, lemon zest, lemon juice, salt, and pepper. Reserve 1 tbsp.


PAT tenderloin dry, and slice lengthwise down the middle, stopping about ¼ inch from the bottom of the tenderloin. Spread apart to resemble a butterfly, cover with plastic wrap and pound to ½ inch thickness. Spread with butter to the outside edges and roll tightly starting with the short end. Tie securely with twine.

HEAT oil in an oven-safe skillet and brown roast on all sides, 5-7 minutes each side. Transfer skillet to oven and roast about 14-18 min, or until 140-145 degrees, flipping halfway.

TRANSFER pork to a carving board, spread the top with the reserved butter, and tent with tin foil; let rest for 10 minutes. Remove twine and slice.

LinkWithin

Related Posts Plugin for WordPress, Blogger...